
Requirements:
- label 태그를 사용하세요.
- id 속성을 사용하세요.
- 입력받는 모든 항목이 필수가 되도록 작성하세요.
- 비밀번호는 최소 10자리 이상 입력받도록 작성하세요.
-
- label 태그 사용하기
- label 태그를 이용해, 사용자 입력을 받는 element의 설명을 추가하세요.
- label는 단순히 설명임을 명시하지 않습니다. label을 click하면 element가 선택됩니다.
- Id 속성 사용하기
- 사용자 입력을 받는 element에 id 속성을 사용하세요.
- label와 element를 연결하기 위해, 각각 필요한 속성(attribute)들이 있습니다.
- 모든 항목이 '입력필수'가 되도록 작성하기
- Create Account 버튼을 눌렀을 때, 입력되지 않은 항목에 대해 입력을 요구하도록 작성하세요.
- 항목이 비어있으면 사용자에게 요구하는 속성이 있습니다.
- 특정 태그 안에 있어야 동작합니다.
- ‘최소’ 10자리 이상의 비밀번호 입력받기
- 비밀번호의 길이가 10자리 미만이면 다시 요구하도록 작성하세요.
- 입력값의 길이를 제한하는 속성들이 있습니다. 최소 혹은 최대 길이를 설정할 수 있습니다.
- label 태그 사용하기
<!DOCTYPE html>
<html lang="en">
<head>
<meta charset="UTF-8">
<meta http-equiv="X-UA-Compatible" content="IE=edge">
<meta name="viewport" content="width=device-width, initial-scale=1.0">
<link rel="stylesheet" href="style.css">
<title>Document</title>
</head>
<body>
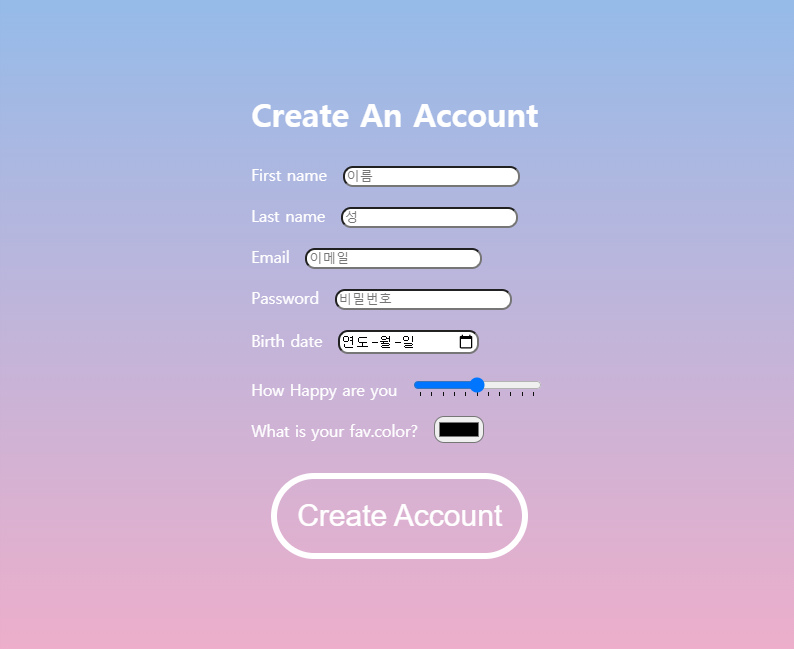
<h1>Create An Account</h1>
<form>
<label for="firstName">First name</label>
<input id="firstName" type="text" placeholder="이름" required><br>
<label for="LastName">Last name</label>
<input id="LastName" type="text" placeholder="성" required><br>
<label for="email">Email</label>
<input id="email" type="email" placeholder="이메일" required><br>
<label for="password">Password</label>
<input id="password" type="password" placeholder="비밀번호" minlength="10" required><br>
<label for="birthDay">Birth date</label>
<input id="birthDay" type="date" placeholder="생년월일" required><br>
<label for="point">How Happy are you</label>
<input id="point" type="range" list="tickmarks" required><br>
<datalist id="tickmarks">
<option value="0"></option>
<option value="10"></option>
<option value="20"></option>
<option value="30"></option>
<option value="40"></option>
<option value="50"></option>
<option value="60"></option>
<option value="70"></option>
<option value="80"></option>
<option value="90"></option>
<option value="100"></option>
</datalist>
<label for="point">What is your fav.color?</label>
<input id="point" type="color" required><br>
<button>Create Account</button>
</form>
</body>
</html>
html{
    width: 100%;
    height: 100%;
    background: rgb(238,174,202);
    background: linear-gradient(0deg, rgba(238,174,202,1) 0%, rgba(148,187,233,1) 100%);
    display: flex;
    justify-content:center;
    align-items: center;
}
input{
    margin: 10px;
    border-radius: 10px;
    outline: none;
    caret-color:#ff0079;
}
h1, label{
    color: white;
}
button{
    background: none;
    margin: 20px;
    padding: 20px;
    border: 6px solid #fff;
    border-radius: 50px;
    color: #fff;
    font-size: 30px;
}'웹 개발 > HTML,CSS' 카테고리의 다른 글
| 노마드코더 : 코코아톡 챌린지8일 transform, @keyframes 사용 (2) | 2021.09.15 |
|---|---|
| 노마드코더 : 코코아톡 챌린지7일 Pseudo Selector(의사 선택자) 사용하기 (0) | 2021.09.13 |
| 노마드코더 : 코코아톡 챌린지6일 flex box 이용하기 (0) | 2021.09.11 |
노마드코더 : 코코아톡 챌린지4일 form과 input 태그